 During a recent visit to Florida with our God-daughter Kaylee, we managed many visits to the beach were we built sand sculptures, scavenged for seashells, picnicked while listening to the waves, and of course, frolicking in the ocean (fully dressed on one occasion). After our collection of shells starting piling up, I came up with this picture frame craft for us to do. These are similar to the ones you sometimes see in beach destination gift shops. I’m not necessarily a big fan of those frames, however when using sea shells, and sand that we collected from the beach, this DIY captures the memories we created on our special visit.
We printed off pictures from our fun at the beach to place in the completed frames. Wouldn’t these would be wonderful gift or keepsake to make after returning home from a beach wedding/honeymoon vacation? Just collect shells and a small bag of sand from the beach to take back in your luggage. These are very inexpensive to make and an easy craft that even small children can take part in. Of course know the local laws, most beaches have signs posted on their beach rules. Most beaches you may collect non-living shells from the beach only. As well, know your rules for taking sand and shells back into your own country if on vacation. (See tip on bottom) Materials needed:
- Seashells
- Dried sand collected from the beach
- Picture frame of your choosing
- Modge Podge – I haven’t used white craft glue but I am sure it would work as well. Drying time and coverage may vary
- Small 1″ paint brush
- Mesh sieve (Sifter) to sift out large particles from the sand
- Craft paper or cardboard to protect the surface you are working on.
- Glue gun and glue sticks – I recommend a low temperature glue gun if you have little ones helping*
- *A small bowl of ice water – If you get hot glue on a finger dip immediately in ice water to prevent burning
 On a protected surface (we used large craft paper to protect the table) Remove the frame back and glass and set aside.
 Have all the materials ready. Make sure to remove any residue from stickers etc on the frame by washing with soapy water and let dry. I like to pour the Modge Podge in a small dish to prevent sand from getting in the jar.
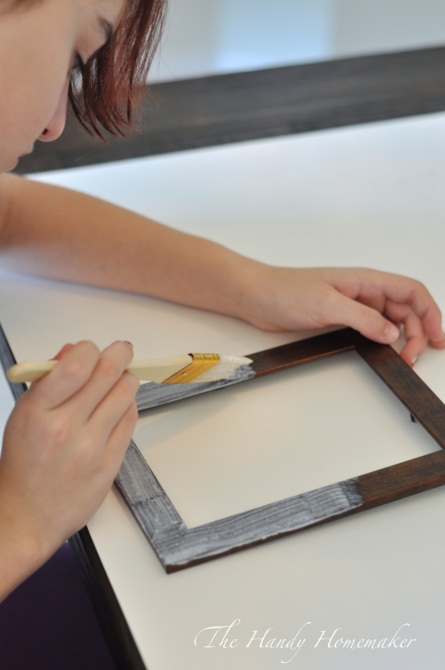 Start brushing the Modge Podge all over the frame until the front is completely covered. Don’t be light on the glue, but try not to get drips.
 Don’t forget to paint the sides with glue.
 You are now ready to sand.
 Now while the glue is still wet, place some sand in the mesh sieve and start shaking side to side over the frame until the glue is covered in sand.
 It will look thicker than it will finish once the glue dries. This is what you want. Don’t worry 🙂
 Don’t forget to gently tilt and sand the outer and inner edges.
 It helps if you have an extra pair of hands.
 Let dry for 30 minutes before touching.
 Gently pick up and tap the excess sand away. Don’t panic if you can still see you frame through the sand. It will need 2 coats of Modge podge and sand to cover completely.
 Once all the excess sand is removed you are ready for the second coat. If the glue is a little tacky, let it dry for 10 minutes longer with the excess sand removed.
 Brush on a second layer of Modge podge.
  Remember the edges.
 You can see that the glue adheres and covers better to the frame after the first coat of sand and glue have dried. Once completely covered in glue, repeat the step of covering the glue with a layer of sand.
 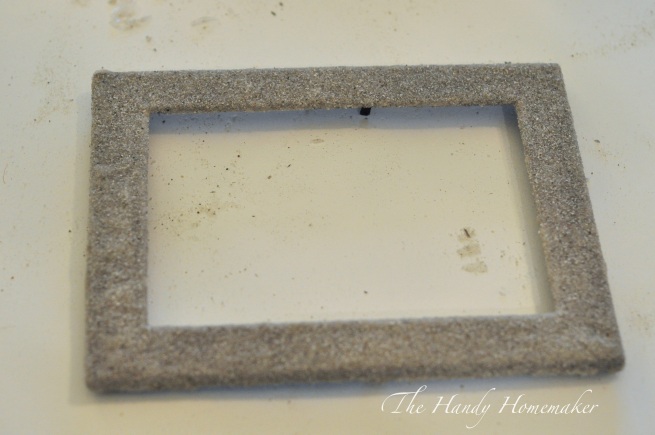 Set aside and let dry completely before removing excess sand. We decided that coats gave us the coverage we wanted. However depending on the sand and frame color to start you may need a third coat of glue and sand.
 Close up view of the dried frame with 2 coats of glue and sand.
 Now you are ready for adding the shells you have collected. Plug in the glue gun to heat up.
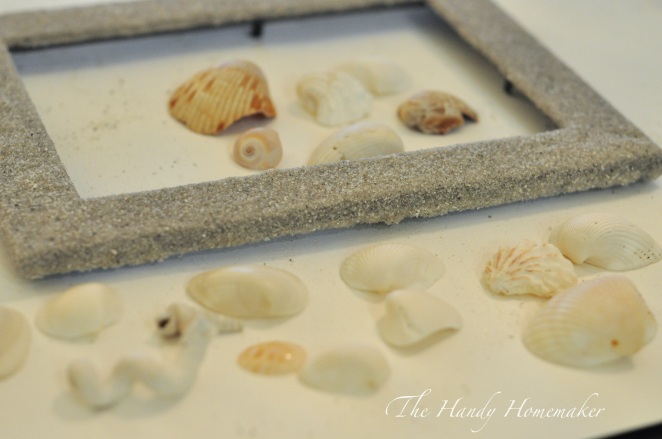 While the glue is heating up, I like to lay the shells out and decide on a pattern before I start glueing them on.
 Even though we were using a low temperature glue gun, I placed a small bowl of ice water on the table to dip a finger or thumb in if glue lands on more than the shell. Add a ring of hot glue on the part of the shell you want to adhere to the frame.
 Hold in place until the glue cools and sets.
 Keep adding shells until you get the look you want.
 Overlap shells and glue in place for a dimensional look.
 Give the frame a few minutes for all the glue to harden.
 Step for adults: Use a craft knife (or by all means a steak knife as seen here) to gently scrape and remove any excess glue and sand that may have wandered to the back of the frame where the glass needs to lay.
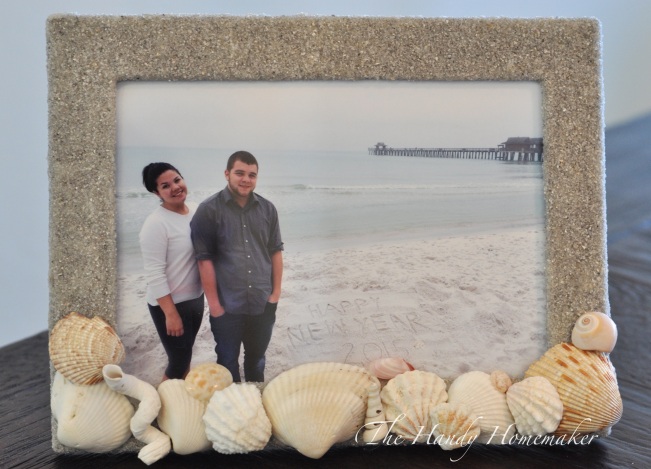
  Add the glass and your favorite beach picture and you are finished. I love this picture of my cousin Sara and her daughter Kaylee on their first visit to Naples Pier Beach, and the day we ended up swimming fully dressed and then drove home soaking wet. What a great memory!!
 During another day I took this shot of them enjoying the waves together.
 My frame was from shells collected on the morning of New Year’s Day 2015 with my beautiful children.
 Love the look of this frame on my side table with these white knobby (thorny) starfish that I purchased at a local shell shop (Blue Mussel)
 Enjoying a day the beach with our sweet Kate.
 No bathing suit.. No problem.. You only live once.. Play in the waves like no one is watching..
Tips:
- According to the Canadian food inspection agency you are allowed to bring in sea shells, small quantities of sand from salt water beaches and items made from the two. However they need to be free from all animal, soil and plant debris and you must claim that you are bringing them back with you in case they want to inspect your items.


11 responses to “Seashore Beach Vacation Memory Picture Frame”
Such a cute keepsake! Another great idea Mina!
LikeLike
Thank you Trina, my biggest fan!! xo
LikeLike
Good job, I really like that idea. You are a good teacher Miss Mina!
LikeLike
I just love this sea shell frame Martha……its beautiful
LikeLike
[…] Tutorial via The Handy Homemaker […]
LikeLike
[…] really cool ones! The plan is to make them into a picture frame for our favorite beach photo. This DIY seashell picture frame by the Handy Homemaker blog looks […]
LikeLike
I love these! I am going to make a couple for my bathroom.
LikeLike
[…] DIY Beach Picture Frame from The Handy Homemaker […]
LikeLike
[…] DIY Beach Picture Frame from The Handy Homemaker […]
LikeLike
[…] 11. Beach Picture Frame […]
LikeLike
Love these. Will the sand flake off a little at a time?
LikeLike