

Introduction: How to Make a Raised Garden Bed Cover With Hinges


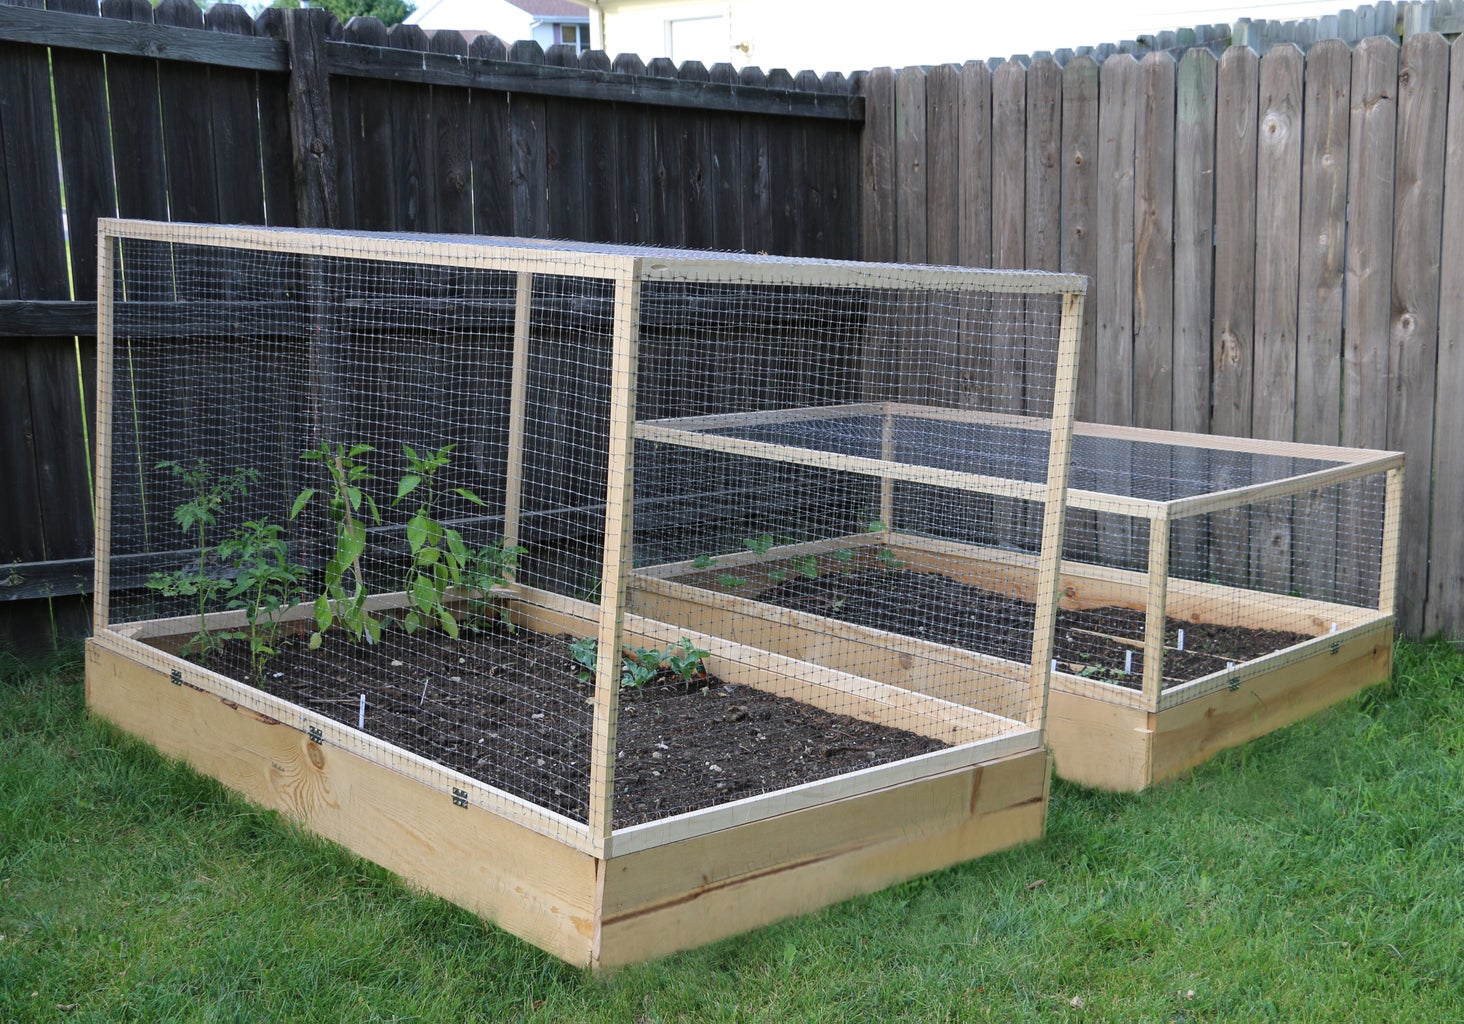
This Instructable will take you through the process of making hinged covers for your raised garden beds. This will help you keep all the wildlife out of your garden and prevent them from eating all your plants.
A bunch of my plants that were well established, were all eaten the other day - likely from an adorable bunny in my yard. So, I was on a mission to fix this problem fast! So, let's get started!
Step 1: Supplies Needed for Hinged Raised Garden Bed Covers


I made two raised garden bed covers for garden beds measuring 4 feet by 6 feet in length. I made one cover larger than the other and I will share the measurements I used for both of them. You will need to figure out how to make it work for you, depending on the size of your raised garden bed. One of my garden beds has plants will get quite large, so that is why I made the cover so big. The other one will have smaller plants and did not need a cover quite that large.
If you have questions, let me know.I will be updating this later with links to some of the items I used, in case you are interested.
Wood Cuts
- (4) 1x2x72in
- (4) 1x2x47in
- (4) 1x2x36in or (4) 1x2x16in
Optional for Large Cover
- (8) wood corner brackets for extra stability
- I used scrap 1x2 board and cut them about 5 inches long
- See image above for example
Tools & Supplies
- A miter saw to cut the wood to size (or have Home Depot cut the pieces for free)
- measuring tape & wood glue
- a drill (I am using the Matrix and love it)
- Kreg Pocket Hole Tool (any type will work fine - I bought the Kreg Pocket Hole Machine & Used it)
- Screws - I used the 1 1/4 inch Kreg Pocket Hole Screws
- Plastic Fencing - I bought this from Walmart.com - but this one from Amazon is larger & would work better
- Staple Gun to use to attach plastic fencing
- Hinges (at least 2 per cover) - I used ones that were small as that is what I had. Larger would be best.
- Clamps or something to secure wood after glued (I used bricks)
- Optional: wire (I used jewelry wiring to "sew" the fencing material together)
Holly Mann is a participant in the Amazon Services LLC Associates Program, an affiliate advertising program designed to provide a means for sites to earn advertising fees by advertising and linking to amazon.com.
Step 2: Cut the Wood, Pocket Holes & Glue


The first thing to do is to cut all the wood to the correct dimensions. I used a miter saw and it made it fairly quick and easy. I suggest going out to your raised garden bed and taking the measurements, to make sure they are 100% accurate. I say this because my measurements were slightly off in the end due to the outdoor boards being slightly warped from the weather. So, although I thought I had correct measurements, they were a bit off. And, you must also take into account that you will be using pocket holes to secure the sides and this will affect the length and width of the cover you make.
After cutting the pieces, it is now time to make pocket holes. Take out your Kreg pocket hole tool and set it to the correct measurements and drill one hole into the end of each 47 inch board (4 of them) - one hole on each end of the board on one side. Then, also take out your leg pieces which are either 36 inches long or 16 inches long and drill pocket holes into the top and bottom of them also.
Now, lay out your boards on the ground (see image) to create the rectangular shape. Once the pieces are in the right place, take some wood glue and place it on the end of the shorter 47 inch boards and push that up against the end of the 72 inch board (see image). I used bricks to hold the boards in place as the glue dried. You can use a clamp if you have one large enough. Once the glue is dry, I then took out my 1 1/4 inch pocket hole screws, and drilled them into the pocket holes to secure the whole piece together.
I recommend doing the second piece (for the top) at the same time, if possible.
Step 3: Attaching the Legs to the Cover


In this step you will be attaching the legs to the base. If you are making the very large cover, and you would like to add support brackets to the corners, first do this before continuing. I used my Kreg Pocket Hole Machine to make these pocket holes on the small corner bracket pieces. I cut the 8 pieces with the miter saw first, with a length of approximately 5 inches on the longest side. I managed to use some glue and small 3/4 inch pocket hole screws to attach them to the board. Once that is done, it is time to add the legs to the base.
The legs should have a pocket hole on the top and bottom (see image). Take a little glue and put it on the bottom of the leg board and set it on the corner area of the board (please see image to understand what I mean). Use a brick or clamp to hold it in place as it dries. Once it dries, drill a pocket hole screw in there to secure it to the base. Once all four corners are done, you will then be able to finish securing the whole structure together.
For me, after the bottom part had the legs attached, I then flipped it over and onto the other piece. I then used a little glue to secure it, before I drilled it together with the final four pocket hole screws.
Step 4: Securing the Plastic Fencing to the Cover


It's now time to flip the cover over so it is right-side-up and begin securing the plastic fencing to the structure. I really love the plastic fencing that I bought, though it measured at 3 feet tall, it was off by two inches. This ended up causing me a lot of issues. So, be sure to calculate things and figure out the best orientation for your fencing material, so you can do the least amount of work possible! It was quite a lot easier and faster for me to do the smaller cover. I bought two rolls of fencing material and had more than enough to make three covers I will be sure to share a link to where I bought it, in the supplies step.
Take our your staple gun, and carefully start at one end by stapling the fencing material to the cover. Pull it tight and secure as you go along. I also had a few issues where the staples weren't in all the way, so I used my heavy hammer to hammer those in. Cut off any excess. If you have areas where you need to use two pieces of fencing and there is a hole where little critters can get it, you will need to fix this. I used wire (some cheap, thin wire that was from JoAnn in the jewelry-making section) to secure the two overlapping fencing pieces together. If you are good at stapling, this will not take too long. Cut off any excess fencing material.
Step 5: Finally, Add the Hinges to the Raised Garden Bed Covers


Now it's time to add hinges to the bottom edge of your garden bed. Be sure you know exactly where you want to put them. On my smaller garden bed, I had hinges on the end due to space issues. On my larger one, I had it on the six foot side. Please note, my hinges are way too small and will be replaced soon. I used them because they are all that I had at the time. On my large bed, I used three hinges. On the smaller one, I used two. I did not add anything like a chain or rope to assist once the cover is opened up. For me, I just set something underneath the area where the large cover goes once it is opened up. It could rest on the ground, but I didn't want to put extra strain on the hinges right now since they are quite small. You can also screw in eye hooks and a short rope or small chain so that when you open the cover, it is also held up by the chain or rope. I hope that makes sense. If not, let me know and I will link to a tutorial or add it on here myself.
For the placement of the hinges, I just figured out the center of the board. Then, I tried to place the two (or three) hinges about equally apart. I then marked with a pencil where the holes will go and then drilled in three small holes. Then finally, I drilled in the small screws to secure each hinge.
Once outside, I placed the cover on top of the bed and centered it exactly where I wanted it to go. Then, I did the same thing I did inside. I marked the hole placement, drilled small holes and then drilled in the screws and secured it in place.
If for some reason your garden bed wood is warped slightly and your measurements are slightly off (leaving a hole or space anywhere) then do not worry too much! Take some extra plastic fencing material and your staple gun outside with you. Cover that hole or space with a small piece of plastic fencing material. In my area, I have a massive number of rodent-like creatures - from squirrels to chipmunks and also lots of adorable bunnies that love eating my plants. So, I must be sure to cover up every single area of these raised garden beds. So, if you see any holes in the wood (mine had one) then also cover that with some plastic fencing.
If you have any questions at all, please feel free to ask!

First Prize in the
Gardening Contest 2017


