How to Build a Raised Bed with Retaining Wall Bricks
I’ve probably gone through around 1500 retaining wall bricks, some as large as a foot across, the past 2 years in building numerous raised beds around my property. These bricks are relatively inexpensive (especially when compared to stone), look great, and are also easier to install than stone.
It may seem like a large project to undertake, but really it’s not, and once you get started it goes quickly. A small raised bed can be done in a matter of hours, a larger one might take a weekend.
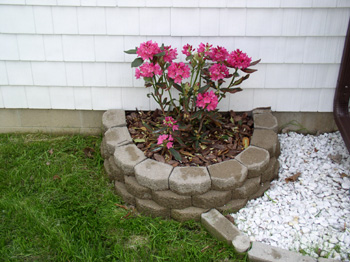
For this article I’m going to use the most recent bed I completed as an example. There is a 4 foot border on the north side of my house that is mulched with stone. This area includes some large potted plants, a bush, and my air conditioner. I wanted to terminate the border and you really need something to anchor the end of it if you want it to look good. So I decided to put in this half circle raised bed at the end of it. All the materials for this project were purchased at Lowes for around $100 total.
Also, this project uses retaining wall bricks specifically. The reason is that these bricks are built with little tongues on the back that allows you to dry stack them and backfill without the dirt pushing the wall apart. You cannot do this with normal bricks so I do not recommend using them.
Materials Needed
- Square Shovel
- Commercial Grade Landscape Fabric
- Landscape Fabric Pins
- Retaining Wall Bricks
- Landscape Block Adhesive
- Dirt for backfilling
- Masonry Chisel
- 3-Pound Sledgehammer


Step 1: Excavation
The first step is for you to dig a level trench approximately as deep as the height of one of the bricks you’re using. The reason is that the first course of bricks needs to be laid below grade for stability. To make it level I prefer a square shovel, it makes it easier to level the bottom.
Now in my particular case there was no sod growing here yet so I did not have to do any sod busting, which is believe me the hardest part of this project if you have to do that.
If you have loose soil you should tamp the bottom of your trench for future stability, however I did not do this as I’ve got pretty hard clay that isn’t going to settle.
When leveling the soil you can get quite technical with it and break out your level, the end result will look nicer, but I just tend to eyeball it and it works al right. I always have the intention to use the level, and I usually bring it out, but I never actually seem to use it.
Step 2: Lay the First Course
Once your excavation is done use some commercial grade landscape fabric (trust me, its worth the little extra expensive) and lay it in the trench with the excess going towards the interior of the bed. You’ll want to lay the first course on top of the fabric to hold it in place then you’ll want to line the interior of the bricks with the fabric to prevent dirt from leaking out.
The first course is definitely the hardest and here is where you’ll do minor grade adjustments to keep it level. I recommend having a small trowel handy and as you lay the bricks you can either add or remove soil to keep them level and straight.
Once the first course is done, you’re actually almost done with the entire project, the rest is just lifting & moving bricks.
Step 3: Lay the Remaining Courses
You’ll want to use some landscape block adhesive between the courses, which looks like caulk but is meant to bind these blocks together. Now you can do without this step, but I’ve found that it is an easy way to add stability to the final wall.
So squirt out a run of adhesive on the first row, or do it in segments if you have a very long wall, and start laying blocks on top of it. Since you leveled the first row the second row should automatically be leveled, so really you’re just laying the bricks on top.
You might run into a problem though with having a gap that is too small for a brick to fill. So you’ll need to cut the bricks. If you have a tile saw, congratulations, if not, you’ll need a hammer and chisel. I like a 3 pound sledge as it does the job better.
You basically will want to score the brick all around using the chisel and slight hammer pounding and then just have at it. If you break the brick in the wrong place they’re usually only around $1 each, so grab a new one and start again.
Step 4: Finishing it Up
After your final course is laid, backfill, plant, fold the remaining fabric over towards the center of the bed, pin in place, and mulch. That is all there is too it.
There are also variations on this project. You can make long curvy borders, for instance I have a 500 foot long wall only about a foot high that curves along the entire back fence of my property and most of the north side as well. You can also experiment with multiple tiers, building a larger bed, and smaller beds within it. Whatever you do using bricks in this method is a good way to add architecture to your garden.