Making a strawberry pyramid: 5 projects with simple instructions for your own garden
In addition to being very interesting from a nutritional point of view, strawberries are among the most delicious and popular fruits. Ideal to consume as is, they are also widely used to prepare delicious jams, coulis, sorbets, and other desserts. You might already be dreaming of growing your own strawberries on the balcony or in the garden. If this is the case, know that nothing is stopping you!

Strawberries are fairly easy to grow and maintain, and even beginners will do this without a problem. One of the great advantages of these fruit plants is that they do not take up a lot of space, and as a whole, they are undemanding. For this reason, they can be grown in different ways on the balcony, either in pots or in planters. But today, we are going to show you how to make a strawberry pyramid.
Not cumbersome, this structure can be easily dismantled at the end of the season or bored in place for the coming year. True, the strawberry pyramids help save space because the plants are grown in height. And that is not the only advantage of these extraordinary tours. Since many strawberries are not planted at ground level, caring for them and harvesting is much easier, as you don’t have to bend or squat all the time. Sounds pretty handy.
Make a Staggered Strawberry Pyramid
This wooden strawberry pyramid is composed of three levels, which are superimposed in a staggered manner. This is a great solution for saving space, as it allows you to plant the strawberries vertically. It is still possible to build the tower out of pallets or use boards cut by yourself or bought ready to use in the hardware store. To make a homemade strawberry pyramid, the necessary measurements are as follows:
- For the lower tray: 4 boards 80 cm long and 20 cm wide; 4 wooden mounting slats 20 cm long
- For the middle tray: 4 boards 60 cm long and 20 cm wide: 4 mounting slats 30-40 cm long
- For the upper tray: 4 boards 40 cm long and 20 cm wide: 4 slats 30-40 cm long
You will also need:
- Screw
- Drill
- Wood glue
- Lots of potting soil
- Strawberries
- Wood lacquer – alternative
A wooden strawberry pyramid – DIY instructions
 If you plan to make a strawberry pyramid, start with the lower bin, which is the largest of all. Take the first plank and screw a 20 cm slat to one end. Then, maintaining a right angle, secure the second plank to the batten. Continue like this until you get a square, which is your first bin. As for the manufacture of the following two bins, the mounting slats are longer than the boards are wide. Secure them so that they are flush with the boards on one side and protrude on the other.

Once all the boxes are assembled, you can paint them in the colors of your choice or leave them natural. Stack them so that the corners of the upper bin are centered with the planks of the lower bin, and the protruding ends of the mounting slats are pointing down. Screw the mounting slats to secure the bins together and make the strawberry pyramid stable. It is at this stage that you can finally fill the tower with soil and plant the strawberries.
Making a tall strawberry tower – detailed instructions
 The next strawberry tower is also very space-saving, as it allows optimum use of the height. This pyramid will become even more practical if you equip it with casters. Thus, you can move it at any time, despite its heavy weight. You need to :
- 1 central beam at the desired height
- 1 square board for the base
- 4 small beams to strengthen the base
- 4 long beams to create the structure of the pyramid
- Planks for the different floors
- 4 wheels
- Wood glue
- Screws and drills
- 1 saw
- Strawberry plants
- Potting soil
- Lacquer wood as you wish
A wooden strawberry pyramid to make yourself step by step

As with the previous project, it is recommended to start with the construction of the base. Mark the center point on the board for the base, pre-drill a hole, then screw the center beam below. Then measure the distance between the beam and the four corners. Cut the additional beams to the desired length. Glue them to the baseboard, or fix them with metal brackets for a better grip.
Next, you will need four long beams to create the structure of the strawberry pyramid. To do this, measure the distance between the small beams in the base and the top of the central beam. Take into account that you must cut the ends (both the lower and upper ones) beveled. Once the first powder is cut, it could serve as a template for the remaining beams. Glue them or screw them beams in place.
 Once the glue has dried, turn the pyramid over to secure the casters to the bottom of the base. Next, cut out the boards for the floors of the wooden strawberry tower. Take into account the distance between the different levels and make markers. Measure, then transfer the measurements to the boards. Cut these to the necessary size, then screw them in place, distributing them between the structural beams. Remember to pre-drill holes beforehand to prevent the boards from shattering. If you wish, at this stage you can paint the wood. If so, let the paint dry before continuing. Fill the strawberry pyramid with potting soil and plant the seedlings.
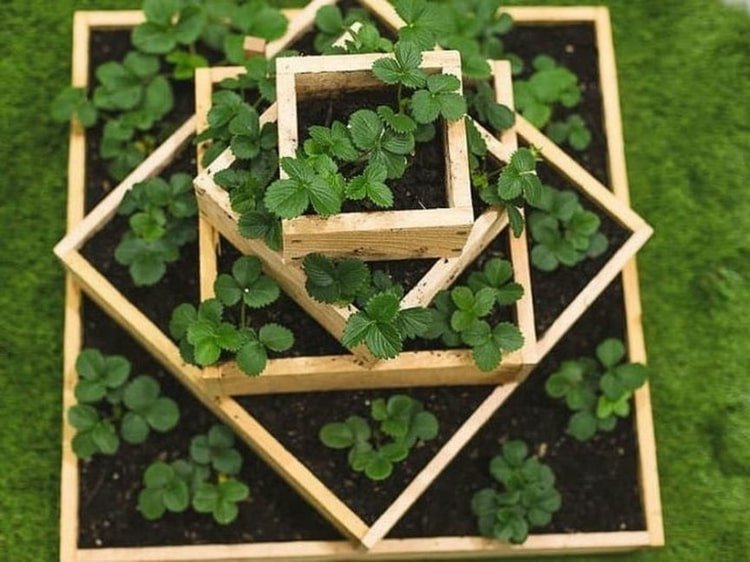
A small, space-saving strawberry pyramid

This strawberry pyramid model looks like the first one, but this time the individual bins are not staggered but are stacked directly on top of each other. In addition, the ends of the boards are beveled, which produces a particularly original effect. To build a four-story pyramid, you will need:
- For the bottom bin: 4 boards of 3.8 cm x 14 cm x 91.5 cm
- For the second floor: 2 boards for the sidewalls of 3.8 cm x 14 cm x 106.5 cm; 2 additional boards 3.8 cm x 14 cm x 55.8 cm
- For the third floor: 2 boards for the sidewalls of 3.8 cm x 14 cm x 78.7 cm; 2 boards for the remaining walls of 3.8 cm x 14 cm x 28 cm
- For the upper tray: 2 boards of 3.8 cm x 7 cm x 43 cm; 2 boards of 3.8 cm x 7 cm x 9 cm
You will also need:
- Screw
- Drill
- Saw
- Reporter
- Fixing brackets
A pyramid strawberry tower – the manufacturing plan

The first step in making this pyramidal mill tower is to screw together the planks of the base pan. You will get a square. Then go to the second level bac. Cut the ends of the side planks beveled at a 45-degree angle. Screw all four boards together. This time you will get a rectangle. Place the second level bin on top of the base bin. Assemble the two remaining bins and superimpose them on the square and the rectangle already assembled. It is not necessary to screw the trays together because this structure is sufficiently stable. However, the pyramid must be reinforced with fixing brackets, as this model is lighter than the previous ones, and one of the boxes may slip later. Better to prevent!
Build yourself a simple strawberry pyramid from wooden tubs to grow strawberries in height
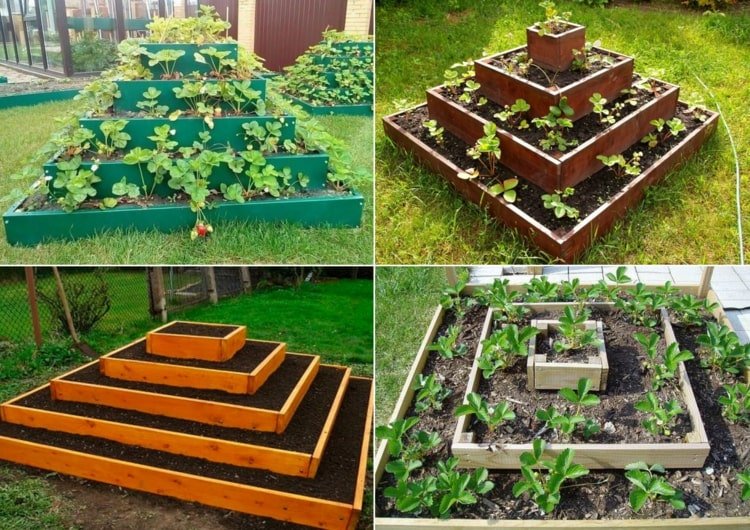
Want to make a simpler strawberry pyramid? Then the following project will suit you perfectly! All you have to do is build wooden bins of different sizes that you need to layer on top of each other. Each following square is smaller by a few centimeters, making it possible to create a pretty pyramid, practical and stable at the same time.
The great advantage of this structure is that everyone can choose the height and width according to their space.

A round planting pyramid for strawberries and flowers

Building a plantable pyramid for growing strawberries and flowers is not necessarily a difficult DIY idea. It is possible to use different materials that you already have or that you can easily find. Your pyramid could sport an angular or round shape, like the one shown above.
Once the necessary materials have been provided and the size of the structure determined, you can start manufacturing. Please start with the first level, fill it with potting soil, and put the second level on top. To do this, use a shovel to mark the place to insert the border. Then fill the second level with potting soil.

Proceed in the same way until you reach the top floor of your pyramid. This technique allows you to create as many levels as you want. If you fix your eyes on the photo below, you will certainly notice that a sprinkler has been integrated into the middle. It is convenient and will allow you to water your plants with ease.

A small strawberry tower for a comfortable harvest

Alternatively, make a plantable pyramid from cinder block blocks.

A pyramid for metal strawberries
